J-Pro-22 Metering Pump Warranty and Returns:
Your pump comes with a 1 Year
Warranty from date of delivery and a 90 DAY MONEY-BACK GUARANTEE.
If your pump
fails under warranty, please call or email our office to obtain a Returns Good
Authorization Number before sending us back the pump for repair or replacement
under the warranty. No returns can be accepted without an RGA number.
The Warranty covers repair
and/or replacement of the metering pump but not shipping costs.
While defects are
rare, we do our best to respond to warranty returns fast as we can. Please
allow 3 to 5 business days after pump has been returned for your pump to be
repaired or a new one supplied under the warranty agreement. If the water supply
and its continuous operation are critical, a back-up pump should
be on hand. Shipping charges are not covered under warranty. Any
expedited shipping (overnight, 2-day, etc.) is the customer's responsibility.
Conditions Not Covered by the Warranty:
Power surges or outages that
cause pump failure are not covered under warranty.
Surge
protection is strongly recommended. If a pump is returned for warranty
replacement and the cause of failure is determined to be from a voltage spike,
the pump does not qualify for replacement. This is the leading cause of
failure. Pump failure during, or because of, power failure is not covered under
warranty.
This pump is
intended for indoor use only. The pump must never be exposed to freezing
temperatures, direct sunlight, or rain. If the cause of failure is determined
to be from exposure to any of these environments, the pump does not qualify for
replacement and will not be covered under warranty.
Hydrogen Peroxide Injection System for Well Water 110V - 220V
Remove odors and oxidize iron with hydrogen peroxide with no chlorine or chemical residuals!Adds natural oxygen. No chlorine or chemical residualsWorks over a wide range of water flow rates for most home water wellsGood for well water flow rates from 0.5 to 50 gallons per minute (gpm)Pumps 2.2 to 22 gallons of solution per dayWorks for line pressures up to 100 PSIDual Voltage: works on both 110v or 220vLow Power Consumption: Only uses 22 watts or 0.2 amps of powerMetering pump can deliver up from 2.2 to 22 gallons of solution per day and is fully adjustable to get just the right peroxide residual that is needed.De-gassing valve to assist in primingUnlike Stenner-style peristaltic pumps: no pump tube failures, no rollers to go bad, needs less service, and good for continuous dutyThese heavy-duty metering pumps systems are designed to last for years
with only light maintenancePump easily mounts on the top of the tank or a shelfPrimes fast, doesn't easily lose prime when properly installed and maintainedComplete system includes peroxide pump, solution tank, injection check valve, tubing, fittingsEasy to install! Install so it turns on and off with well pump, OR use optional flow switch for plug and play operationWorks great with a Catalytic Carbon Whole House Backwash Filter. Remove tastes odors and any residual peroxide with a Catalytic Carbon Backwash Filter!Plug in to a Flow Switch (sold separately) or wire to your standard pressure switch pump system. NOTE: If you have a Variable Speed Well Pump click here for the Proportional Flow Chlorinators 
What is included?
J-PRO-22 Peroxide Injection Pump 5 gallon standard, or upgrade to 15 or 35 gallon heavy-duty polyethylene (HDPE) solution tank Tubing and fittings to connect pump to injection check valve and solution tank1 Injection Check valve 1/2" male pipe threadSuction tubing and foot valve to connect solution tank to pumpDegassing / Priming valve to make it easy to prime pumpEasy to read Manual
What size solution tank should I order?
We recommend the 15 gallon tank.There is usually no home well water application where the 35 gallon tank is needed.Most of our customers use 1 to 2 gallons peroxide solution per month.Limit the size of the batch to 60 days, as the peroxide loses potency after two months in the tankDimensions: 5 gallon model: 10" x 10" x 15", height including pump is 26"
Dimensions: 15 gallon model: 14.5" wide x 24", height including pump is 35".Dimensions: 35 gallon model: 18" wide x 33", height including pump is 44".
What type of peroxide should I use?
We recommend using Certified Hydrogen Peroxide 7%For most applications the 7% is further diluted (easy instructions in guide)Most of our customers use 1 -2 gallons of 7% peroxide per month depending on water chemistry and water usageOur 7% peroxide stores for up to 8 to 12 months in cool dark dry location.
How much peroxide will I use each month?
Most of our customers use about a one-half to one gallon of 7% peroxide per monthYou might use less or more depending on the amount of water you use and how much peroxide is injectedThe peroxide system is easily adjustable (instructions and support included)For example if you had it set to inject 10 parts per million of peroxide, one gallon would treat 7,000 gallons of water.
3 Ways To Set Up Your Peroxide System Turn On Automatically:
Detailed printed installation instructions are included with each order.
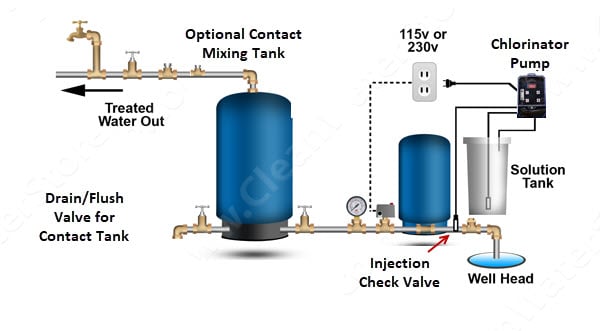
Option 1: WIRE TO WELL PUMP PRESSURE SWITCH
Wire to your well's pressure switch. This is the lowest cost method. Simply install a dedicated wall outler, that is wired in to the existing pressure switch and powered up whenever the well pump turns on (and off)

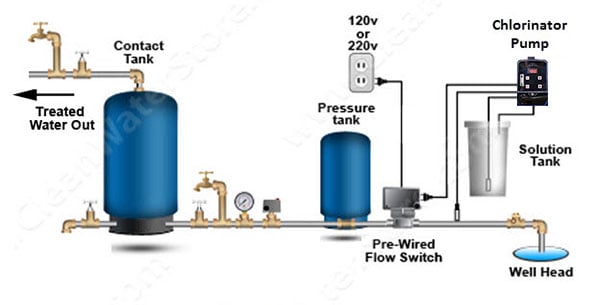
Option 2: PRE-WIRED FLOW SWITCH
Install a flow switch. This makes it fast and easy. No electrical wiring to do and any plumber, or person familiar with basic plumbing can install the chlorinator. No electrician required or electrical wiring to do.
Simply install the pre-wired flow switch. Plug the flow switch into a standard 120v wall outlet. Then, plug the peroxide pump into the electrical outlet on the flow switch. Whenever there is flow, the metering pump will then turn on.

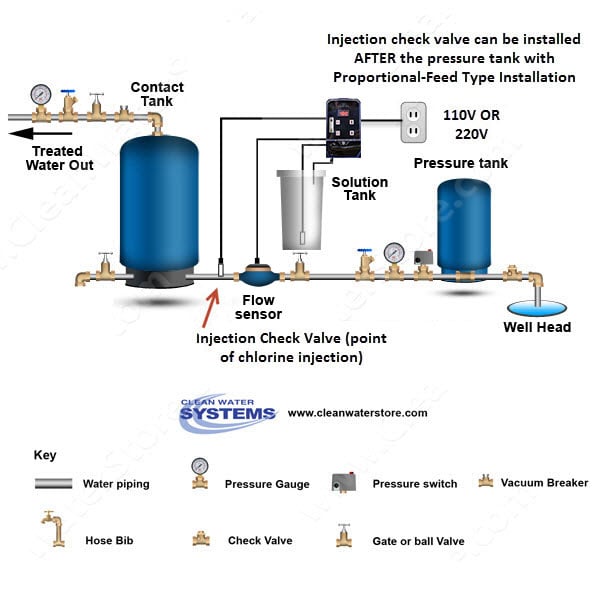
Option 3: PROPORTIONAL - FEED FLOW METER TYPE
Note - this is a different product, See the Proportional Peroxide System here.
This is a proportional-feed type of installation. It is very easy to set up and requires no electrical wiring or electrician to install the system. A flow meter is installed which triggers the chlorinator pump based on the flow of water.
When there is water flow through the meter, the chlorinator will trigger and a programmed amount of solution is injected into each gallon as it passes, regardless of flow rate.
Simply install the flow meter and connect the cable to the chlorinator pump. Plug the chlorinator pump into a standard 120V wall outlet. When the water flows, the pump will pump more or less chlorine based on how fast the water is flowing.
NOTE: Unlike Option 1 and Option 2, the injection check valve is installed AFTER the pressure tank. This option also allows you to inject peroxide after a lateral line to irrigation,or any line you do not want to treat.


